After you have gone through the steps in the previous post of picking the body you want, marking out your desired design, and buying paint specially formulated for lexan, the next steps are to prepare the body for painting. Lexan bodies are a form of plastic which is made from petroleum products (ie: oil). Because of this paint doesn't want to stick to it generally. However there are steps you can take to make sure it will stick and stay for a long time.
Buying paint formulated for lexan is the first step, but to ensure that the paint will really stick you first need to wash the inside of the body, remember we're painting the inside of the lexan to get a glossy finish. If you want a matte finish, keep reading, we'll get to that later. Washing the lexan body is pretty simple. First wash your hands with some liquid dish soap. Dish soap is great because it is meant for removing oils and we have natural oils in our skin. The oils on your skin and in the plastic will prevent the paint from sticking so you want to remove them as much as possible before painting. After washing your hands, get the inside of the body wet but without any big puddles of water. Then put in some regular dish soap and scrub it around with your fingers. You do not want to use anything that might scratch the lexan like a sponge. Any scratches you get on the inside will be visible on the outside even after painting. Once the body has a even layer of soapy lather all over it, rinse it out. Then repeat the process of washing it with dish soap and rinse it out. Then rinse it out one more time just to be sure you got all of the soap and residue out. Now, the final step is to take a lint free cloth and dry the inside of the body gently. The goal isn't really to get it dry, it's more to ensure that there won't be any water spots or lines from where the water was or where it ran to. This is especially important if the water you are using is "hard water" or water that has a lot of minerals in it. Now set the body aside to dry. If you do happen to get some water spots after the body has dried, take the lint free cloth and gently buff them out by slowly rubbing them until they are gone.
Once you have washed and dried the body, the next step is to begin masking. Most lexan bodies today come with window masks. I typically apply these before I do any custom masking. The windows are a large part of the surface of the body and once you have a mask on them it gives you an area that you can touch inside the body for putting on more masking without getting more oils from your skin on the clean body. One thing to keep in mind with window masks is that they don't always match the exact size or shape of the window. The reasons for this vary from poor quality to leaving room to paint a trim around the window to simulate the rubber seal on a 1:1 vehicle. Whatever the reason, it is important to check that the mask for the window is big enough to cover the window before you apply it to the body. There are a few ways to do this but the easiest is to cut the window mask and backing paper completely out of the sheet and hold it against the outside of the body. Remember, you've already washed the inside of the body so you don't want to get a lot of fingerprints and oils from your skin on the clean body. If you do they can make it more difficult for the paint to stick. If the mask isn't a perfect fit, you can decide to place it in the middle of the window and paint a black outline around it, or you can try to place it so it covers most of the window and then use tape to cover the rest of the space.
For masking tape, I use two brands. The first I use is a Tamiya brand 1cm wide "fine line" masking tape. This tape is thin and flexible and good for masking the edges of where you will be painting. It doesn't lift off the surface letting paint "bleed" underneath so it makes nice clean edges between colors. I then use 3M brand "blue painters tape" in a 4cm wide roll to block off larger areas. The 3M tape comes in a longer roll and is cheaper than the Tamiya so it is good to block off large areas with. Using tape is my preferred method for masking as it is relatively quick, cheap and easy to work with. However there are other methods.
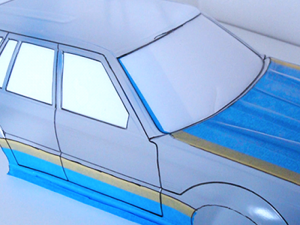
In the image below you can see my markings for my color design as well as the body lines and how I have used the yellow tape (Tamiya Fine Line) to mark the edges between the two colors and the 3M Blue painters tape to block off the larger areas. You can also see that on the left edge of the windshield there is a small piece of blue painters tape to fill the gap that the included window mask didn't cover.
 Another masking tool made by Parma is a liquid mask called "Fasmask". You apply this liquid to the inside of the body and let it dry. After applying several coats you can begin to use a sharp hobby knife blade and "carve" out your design from the Fasmask. Peel away the area you want to paint and start painting. Once that area is covered and the paint is dry you can repeat the process with another area until you are done. The only problem that I personally have with the Fasmask is that it can be difficult to tell if you have every area covered as it dries mostly clear. In addition it isn't always compatible with all types of lexan paint. So it can be possible for the paint to eat through the Fasmask in areas that you don't want it to. For this reason I stick with the tape method.
There is one final method of masking that you can do if you have some specific tools. First if you have access to a high end graphics application such as Adobe Illustrator or any other application that can create vector based graphics you can create the design using that. Then with the application, you can reverse the design to create a mirror image. With your mirrored design you can go to a sign shop that has a machine called a vinyl plotter. It is very much like your home printer, however it is larger and instead of an ink head, it has a knife blade to cut out your design from sheets of vinyl mask. You can then take the vinyl that they have cut for you and just like your window masks apply it to the inside of the body. You would then paint just like you would with any other form of masking and remove the vinyl mask(s) as you add colors. Below is an example of part of a mask that would be sent off to the sign shop to be cut. It is just a series of outlines. In order to get a multi-color design, you would need to have multiple layers of vinyl mask. Be aware that not all vinyl is created equally, some will stick better than others, some will not want to be removed at all. Your best option if you are trying this for the first time is to get several samples from a sign shop and test paint over them with scrap bits of lexan. Some types of vinyl will also change with the paint over the top of them becoming stickier or harder for example. All of these will make it more difficult to get the vinyl mask off and increase the chance that you might ruin your paintjob halfway through or worse, when you are almost complete.
The final thing to remember with masking is that there is no right or single way to do it. Often you may use multiple methods depending on your desired design. On the body for Project Stomper that I showed in the previous post I will be using window masks, tape and the vinyl masking method. Also, if you need to cut your mask design to get just the right shape, be sure to use a new hobby blade. Most importantly take your time with your masking. If you do a "quick and dirty" masking job, the paint job will show it. If you take your time and do a really good job making sure all your edges are firmly pressed down so no paint will leak through you will end up with the paint job that you wanted to begin with.


Comment here
You must be logged in to post a comment.