
The motto of RC Culture is Crawl / Drive / Race / Drift / Fly and we have a fair amount of crawling and drifting covered but I figured it was time to start covering the flying part. For a while now I have wanted to be able to film from the air and I believe that the platform I will build next will allow me to do just that. I am going to be building a mini quadcopter.
If you aren’t familiar with the term quadcopter, it is in the family of multicopters, meaning a helicopter like vehicle with more than one lift rotor assembly. They are most commonly found in tri/y (3 rotor), quad (4 rotor), hexa (6 rotor) and octo (8 rotor) versions but others do exist. In addition, quads come in either an “X” or “+” flight pattern, with the shape indicating where the front of the vehicle is. The “X” version also has a variation known as an “H” quad where the center point of the “X” is stretched from front to back so that the arms do not form an x shape anymore, instead resembling more of an “H” shape.
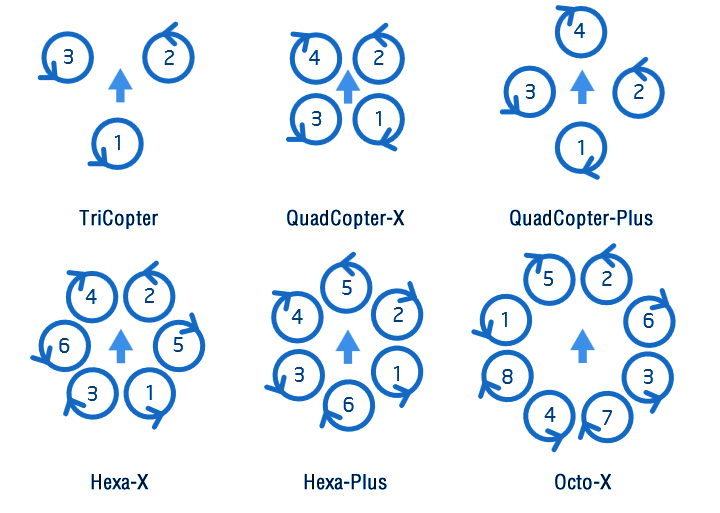
This image was made with images taken from the Naze32 Flight controller manual.
You may have noticed that I said “mini” quadcopter. Multicopters are measured by the distance between the rotors. Multicopters vary in size by quite a lot but most seem to be in the 400-500mm range. The mini quad I will be building is just 250mm which is tiny in comparison. Why build a mini instead of one of the 400 or 500mm ones? Mostly because I want portability. A 250mm sized quad it isn’t much bigger than a typical 2 stick remote control. This means that I can get a briefcase sized case for it and the remote and take both of them with me quite easily. With proper padding I can even check the case on an airline and take it with me on vacation.
There will be four facets to this new build series. The first will be the quadcopter itself, simply getting a mass of parts to fly through the air and then doing some fine tuning and upgrading. The second part will be adding a camera to the frame to do aerial filming. This will let us get some never before seen perspectives on the other RC activities as well as the beautiful area we live in. Next I will add First Person View (FPV). FPV involves adding a camera and video transmitter that will transmit the video footage back to a receiver in real time that can then feed the video signal to either an LCD screen or a pair of video goggles. This allows you to fly the model using the video footage much further than you can physically see. Finally I will go about upgrading a basic transmitter with some bells and whistles. While the transmitter upgrades don’t have anything to do with the quadcopter directly, it will be the transmitter that I will use for the quad and the upgrades will give extended range over the standard equipment as well as allow me to reduce the number of wires on the quad itself and thus the weight of the quad.
If you’ve been looking at quads you may recognize the photo above. It is the Diatone QAV/FPV 250. It is also known as the HobbyKing 250 as they sell it too. In either case it is a Chinese made quad frame loosely based on some other designs. I chose this as my first quad for two main reasons, one is that the frame is very inexpensive, depending on where you buy it, at the time of writing this the frame as pictured above costs around $15 plus shipping. Most other similar quad frames are over $100. This is for just the bare frame with no electronics at all, in another post I will go into all the parts you need to build your own quad. The second reason that I chose this frame is that it is the only one in this size that has a composite main frame which means that it *should* take a bit more abuse than a carbon fiber frame might. Being that this is my first aerial RC of any kind I figured that the primary criteria should be “cheap” and “can take lots of abuse”. That’s not to say that these frames are indestructible, they aren’t. But they do take a bit of abuse and if they break they are cheap to replace.
Once I get some experience and become comfortable flying a quad I will get one of the more “professional grade” quads such as a Lumenier QAV250 which can have an all carbon fiber frame with some very nice features. If you plan your build well, all of the electronics can easily be moved from one frame to another. So once I am ready it is just a matter of purchasing the new frame and moving the gear.
In the next post I will share the first build video to build up the frame so stay tuned!
Oh and don’t worry, Project Expedition is still being worked on, I just gotta find a bit more time to film some of the updates.
Comment here
You must be logged in to post a comment.